Sounds simple right? Well it is, if you know what you are doing. However for those that don’t, try finding a tutorial online. Over the last 3 days I have been trying to find a tutorial that doesn’t ahve you create and install windows intot he VHD while on the target system. What I ned to be able to do is to add a pre-made VHD into windows.
The reson for this is becasue I am not doing it to just one system, I am creating a VHD that I will deplay to several systems allowing them to multi-boot. In order to do this I create the VHD with a virtualization software like VMWare, Hyper-V, or VirtualBox. This allows me to create the instalation I want, including all applications and p[atches, wihtout tying up one of the systems for days on end.
Out of the dozens of sites I found having to do with adding a VHD to windows 7, only one had the details I wanted. So big thanks to Rick Trader over at blogs.interfacett.com. His tutorial allowed me to successfull connect my VHD to the system, and type in a few commands at the console, and voila, I was dual booting in about 10 minutes.
So below I list the steps, with a bit of clarification included.
Step 1: Attached the VHD
The first thing you need to do is make sure your preinstalled Windows 7 system sees the drive you want to add to the boot menu, to do this, go to Control Panel > Administrative Tools > Computer Management > Storage > Disk Management
Now you can either go to Action > Attach VHD or right click on Disk Management in the left pane and select Attached VHD
Once the Attach Virtual Hard Disk apopears, click Browse and locate your VHD, I placed mine in C:VHD
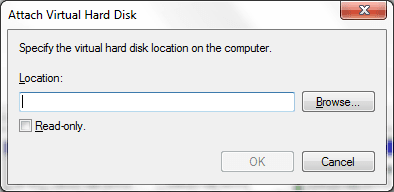
Click OK
Step 2: Using BCDBOOT and BCDEDIT to add the VCD to the boot menu
One of the things Rick forgot to mention is that you should alwasy make a back up of your Boot list first, incase anything goes wrong. Open an Administrative Command Prompt (In the start menu search for “cmd“, when cmd appears in the results, right click it and select “Run as Administrator“) and type in the following commands:
[code] BCDEDIT /export C:BCDCOPY[/code]
Once you have a backup, it is now safe to continue. When you attached your VHD it was assigned a letter, for RIck this was F: however for myself it was K: So modify the next piece of code to suit your situation:
[code] bcdboot K:windows[/code]
If it worked you will see the message “Boot Files successfully created”
Next type in:
[code] bcdedit /set {default} Description "Windows 8.1"[/code]
Make sure the quotes are plain text and not fancy quotes, or your name will be “Windows instead of Windows 8.1
Type in BCDEDIT to verify you now have 2 boot loaders: Windows 8 and Windows 7.
Step 3: detach VHD
The last step is to simply detach the drive. In your Disk Manager, simply right click the Disk (no the partition, but the disk container itself) and select Detach VHD
Thats is, reboot and enjoy being able to dual boot into WIndwos 7 and 8. If you don’t like the Windows 8 boot interface, simply select boot options and make Windows 7 the default and you will get the basic Text version of the boot loader.
Hope this helps all those looking to find a proper tutorial.
If you ever need to revert back, simply type in the following command:
[code] BCDEDIT /Import c:BCDCOPY[/code]